For Makers

Basic Techniques Explained

Explore the art of cardboard upcycling, where each piece reflects our dedication to sustainability and minimalist design. This article highlights a project that embodies our ethos, inviting you to delve deeper into our studio’s unique approach.

Half-Cut
Half-Cut is one of the fundamental techniques introduced by ITOSHIGE STUDIO. It involves cutting through the surface liner and the corrugated flute layer while leaving the bottom liner intact, allowing controlled flexibility without separating the material.
Peeling
Peeling is the process of removing the partially cut layer after a Half-Cut. This technique is commonly used for folded edges, clean finishing details, and creating precise structural transitions.
Creasing
After making a Half-Cut, adding a crease line with a stylus before folding helps create sharp, clean edges. This step improves accuracy and enhances the overall refinement of the final structure.
Types of cardboard
Cardboard comes in many types and structures, each with different strength, flexibility, and surface characteristics. Understanding these differences is essential for selecting the right material for each design.
Thickness of the cardboard
Cardboard thickness is a key design element in ITOSHIGE STUDIO projects. The thickness directly influences strength, proportions, and assembly methods, shaping both structure and visual balance.
Clean corner
Clean corners are the result of careful cutting, peeling, and precise creasing. This finishing step enhances both the visual sharpness and structural strength of the piece, creating a refined and professional look.

Video Tutorials Available

Starter videos

5 Videos

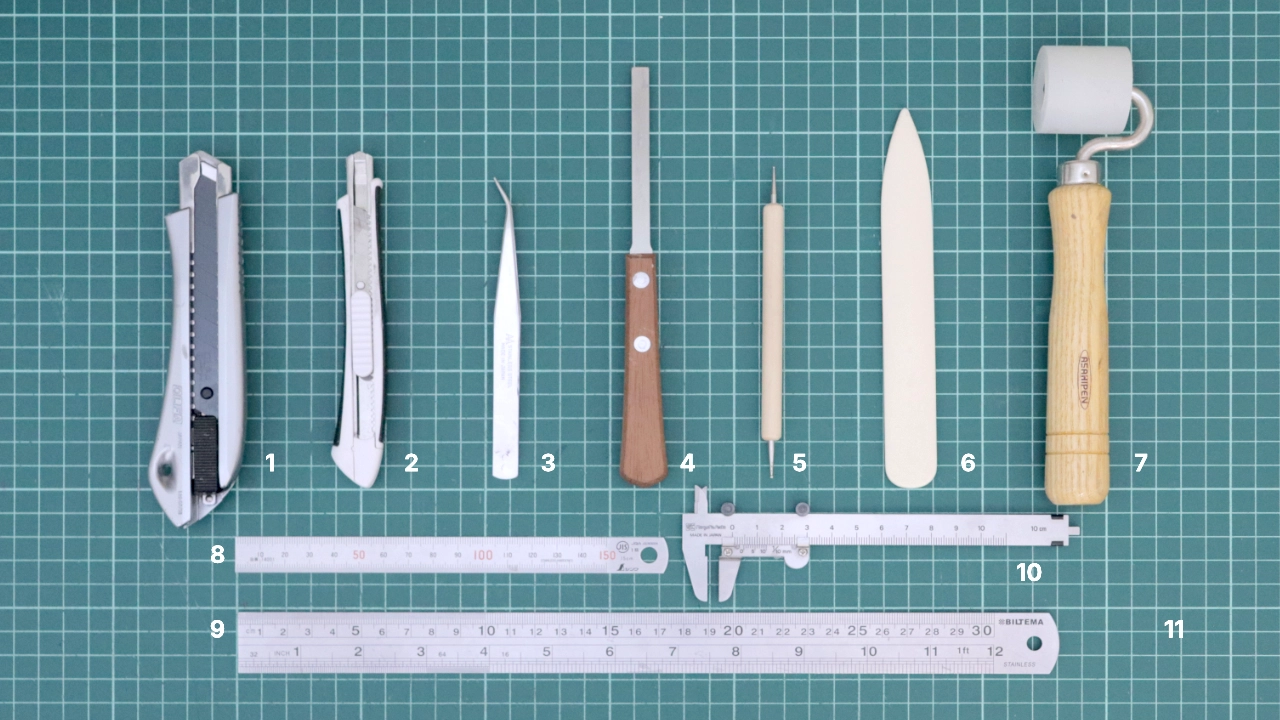
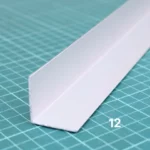
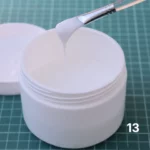
Recommended Crafting Tools

Cut / Half-Cut

1. Large Cutter Knife

Main tool for cutting thick cardboard cleanly and efficiently.

Cut / Half-Cut

2. Small Cutter Knife

For fine cuts, corners, and delicate adjustments.

Peeling

3. Tweezers

Helps peel layers in tight areas where fingers can’t reach.

*Equivalent item may be suggested.

Peeling

4. Sash Scraper

A flathead screwdriver or a metal ruler work well too.

Creasing

5. Embossing Stylus

For clean fold lines without damaging the surface.

Gluing / Assembly

6. Bone Folder

Creates sharp, professional folds and smooth edges.

Gluing / Assembly

7. Hand Roller

Applies even pressure for clean and strong adhesion.

Cut / Half-Cut, Creasing

8. Metal Ruler 150mm

Perfect for small parts and precise detailing.

Cut / Half-Cut, Creasing

9. Metal Ruler 300mm

For straight cuts and accurate measurements on large pieces.

Thickness Measurement

10. Caliper

Ensures exact measurements for high-precision work.

Cut / Half-Cut, Surface Protection

11. Cutter Mat

Main tool for cutting thick cardboard cleanly and efficiently.

*Equivalent item may be suggested.

Cut / Half-Cut

12. Corner Guard

Used as a ruler — the L-shape helps protect your fingers while cutting.

*Equivalent item may be suggested.

Gluing, Assembly

13. Wood Glue

Strong and clean bonding for all cardboard assemblies.

*Equivalent item may be suggested.

*As an Amazon Associate, I earn from qualifying purchases.


Frequently Asked Questions

What type of cardboard is best for making projects?

For most ITOSHIGE STUDIO designs, single-wall cardboard with a thickness of about 3–4 mm (B-flute or C-flute)is the easiest to work with and is recommended for beginners.

This type of cardboard offers a good balance between strength and flexibility, making it suitable for cutting, folding, and assembling small furniture or storage projects.

For projects that require more strength, such as cabinets or larger boxes, double-wall cardboard (around 6–7 mm thick)can also be used.

It is worth noting that Amazon shipping boxes often contain a high percentage of recycled paper, which makes the cardboard softer. Because of this, they can be more difficult to use for techniques such as half-cuts.

Instead, cardboard used in packaging for televisions, appliances, or furniture is often harder and more consistent in quality, making it easier to work with.

One of the best sources of cardboard is packaging from appliances or furniture, such as TV boxes or large product packaging.

These boxes are often made from stronger cardboard and tend to have more consistent quality, which makes them easier to cut and shape.

They are also usually large enough to provide good material for making cabinets, storage boxes, and other furniture-like projects.

Reusing this type of packaging is a simple and accessible way to start making projects while also embracing the idea of upcycling everyday materials.

First, try experimenting with different types of cardboard.

Darker and harder cardboard tends to work better for half-cuts. Cardboard used for Amazon shipping boxes is often lighter in color and contains more recycled paper, which makes it softer and easier to cut all the way through. This can make half-cuts more difficult to control.

Another unconventional technique is to lightly file the tip of your utility knife blade.

Brand-new blades are extremely sharp, and sometimes they cut too easily even when you try to apply less pressure. Slightly dulling the very tip can make it easier to control the cut and prevent the blade from going all the way through the cardboard.

Finally, try not to complete the cut in a single pass. Instead of applying strong pressure, gently slide the blade along the line several times. This gradual approach makes it easier to control the depth of the cut.

You do not always need to cut perfectly through the corrugated layer. In many cases, partially cutting the surface and then folding the cardboard to finish the break works just as well.

Watch tips video => Struggling with Half-Cut? Just Do THIS to Your Cutter Blade! 


Made by You. Our Makers Community!

If you are working with ITOSHIGE STUDIO templates, please share your creations with us. We would be thrilled to see them come to life. Feel free to tag us via your social media account or share your creations directly with us at studio@itoshige.com. THANK YOU.

See more on Instagram